Sunday, July 24, 2011

We Built This City on Rock and Roll. and Sand and Clay.


Ah, Starship.  At least they had it half right.  After a long hiatus, I thought I would post some tips about beginning a garage addition or doing anything to a garage that requires some digging.  (Hmm, suspicious!)

You want to find out three things:  How deep is your foundation?   If you have an adjacent building, how deep is your neighbor’s foundation/footing? What’s the soil condition like?  These are simple questions, but their answers could have a significant impact on the cost of your project and the length of time it could take to complete it. 

It’s advisable to investigate your soil quality early, like, as soon as you start to seriously consider a garage addition.  If your plans include digging several feet below the existing level along a property line, you should contact a soils engineer to obtain professional soil testing.  However, if you’re aiming to gain a foot or two of head height, or are interested in an area that is far from the property line, then you should simply dig a test hole, or ask your contractor to do it. If you plan to excavate along the property line, dig this hole along the inside of the exterior wall. Break up a small area of concrete if necessary.  Then dig outward toward your foundation and find the bottom of it.  In garages that have areas with exposed crawl spaces, this exercise is even easier.  Go into the crawl space and dig a hole, preferably a couple feet deep.

Here are a few potential scenarios and how they might affect your project:

1)  Let’s say you would like to drop a stair from your main living space down to the garage level to add a rec room or a master suite.  When you go to dig a hole in the crawl space, you find that digging is not so easy and you keep hitting large rocks. This discovery is not a huge deal, but it’s important that to relay the information to any contractor bidding your job.  This simple step will ensure that potential contractors will check out the labor involved and bid the excavation work correctly.
Unanticipated, difficult excavation can quickly eat up any contingency fees that a contractor works into his or her bid. (Be sure that there IS a contingency fee included in the first place!)  In the worse case scenario, a contractor could respond to this issue by shortchanging other areas of the project to compensate for the time and manpower that had to be allotted to the foundation work. An early awareness of excavation difficulty can help avoid an issue that could easily snowball into other problems.

2)  This time you want dig down about a foot to give the proper ceiling height to new rooms. Let’s say there are buildings on both sides of your home.  You dig a hole through your concrete slab and find that your foundation extends about six inches below your existing slab.  This tells you that you’ll need to replace the foundation in the areas where you plan to lower the floor.  The soil is not soil at all, but rather sand, so you can scoop enough out to find out your neighbor’s footing is the same depth as yours. This discovery is significant for a number of reasons.  In order to avoid undermining your neighbor’s foundation (and a resulting lawsuit), the process of excavation must be much slower and painstaking so that the neighbor’s footing is shored up every step of the way. This particular finding is troublesome due to the fact that sand is not easily shored.  It requires a ‘grouting’ process that converts sand to sandstone, making it capable of holding up your neighbor’s home while you work on yours.  All of this translates to more time and money, so again early discovery is key. 

3)  Lastly, an example involving soil and it’s trusty friend, water.  Similar to above, you plan to dig down because you are just shy of the required head height for a rec room at the ground floor of your home.  You’ve checked your foundation depth and it extends well below the depth of your desired new slab.  The only thing is, after digging your hole, you notice that it’s quite damp and actually develops a small puddle overnight. The soil quality is a little bit like clay, but fairly stable.  As it turns out, your back yard and neighboring properties generate a lot of runoff water that has never managed to permeate the existing slab.  This discovery tells you that you’ll need a drain along the rear of your house to divert the water away from your new slab.  There’s a chance that the new slab would hold up just as well as the last, but who wants to take a chance when it comes to water in your home?

If you’ve made it to the end of this blog entry about dirt, I commend you. I hope these examples are useful. We’ll get back to design in the next entry, and yes, pictures!

Monday, May 9, 2011

Waller Street Remodel

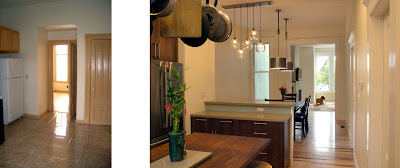
Above:  Updated kitchen     Below: Kitchen before the remodel

At long last, I am back with a closer look at another remodel in San Francisco.  Whereas my last remodel entry focused on creating new living space in a former garage, this one is all about opening up an existing Edwardian flat. Check out the before and after plans below to see how we were able to make better sense of disjointed spaces, and give this 100+ year old home a modern and airy feel. 
 
By taking over hallway space, we were able to create a proper master bedroom, with two closets and a master bathroom (to be completed in a later construction phase.) Three brick chimneys were removed and the bricks salvaged for landscape work in the back yard.  A new gas insert fireplace was installed in the living room, but the other two lent their space to better uses. The bulky hot water heater was replaced with an on-demand tankless water heater. 

View from the back of the flat, before and after.
This is the lower of two flats, so it was a challenge to bring natural light as deep into the space as possible.  The south-facing facade, extremely high ceilings and 7 foot tall windows were a huge help.  
Dining room looking toward the kitchen, before and after
This place was definitely a fixer, but it had no more or fewer issues than a typical building of its era.  Most walls were out of plumb from settling. Most openings were far from square. Its wiring and electrical panels required updating and replacement.  The unreinforced masonry foundation had survived both the Loma Prieta earthquake AND the 1906 earthquake, but the new owners weren't about to place bets on whether it could handle another Big One.  They got started on replacing the foundation and decided to install the new one at a slightly lower level to afford an easier addition of future living space at the garage level. 

The foundation work introduced a significant hiccup during construction.  The contractor quickly determined that the existing foundation was sitting on sand (rather than compact soil) and the neighbor's footing, though newer, was just as shallow as ours.  San Francisco has serious rules about undermining the structural integrity of neighboring foundations.  The work could proceed, but first we needed to make sure that the neighbor's foundation would remain supported.  In order to do this, we needed to transform the sand into sandstone by infusing it with an extremely fine mix of liquid concrete.  I find the whole process pretty fascinating, actually, but it's never good news to a client when they need to spend money on something they can't see, especially if that something belongs to their neighbors.  There should be a contingency in every budget for this kind of occurrence, but the best possible scenario is to find out as early as possible in order to compensate for the cost in other areas.

Ok, back to the 'after' photos:
This enormous pocket door was rehung and repaired.
The dining room beyond is separated from the kitchen with a raised peninsula.  Note the black chalkboard paint underneath the bar...it doubles as a canvas for an active toddler.  
Ample seating is a key component for a family that likes to host gatherings.  Friends can belly up to both the peninsula and the central kitchen island.  For larger parties, the dining table can be moved to the side entirely and the pendants lifted up by their counterweight (thank you, CB2!)

Cabinets are a mix of walnut slab & pearl white laminate.
Lighting a kitchen with 11 foot ceilings can be a bit tricky.  Consider the Title 24 requirement that 50% of the wattage be low efficacy, and the problem becomes more complex.  Recessed ceiling lights were not an ideal solution in this scenario due to the height of the ceiling and the fact that it had to be a fire-rated construction, since it divides two dwelling units. The owners decided to take their electrician's suggestion to create a soffit along the ceiling that would hold dimmable fluorescent uplighting and warmer recessed downlighting. 

A drying rack is concealed in the cabinet above the sink.
These custom cabinets by Kirby Cabinetry in Berkeley, aim to provide simple solutions to help this kitchen function as smoothly as possible.  The cabinet above the sink is modeled after a very common European application.  The concealed drying rack allows the counter to be cleared of clutter and provides a place for hand-washed items. The dishwasher is concealed too, behind a beautifully crafted walnut panel to match the cabinets.


Garbage & Recycling slide-out, with a compost drawer above.
Food scraps are easily tossed into the compost drawer. The inset bin is then removed and emptied. 


It was such a pleasure to see this project come together. It's an excellent example of setting the course for a long term vision of a home.  This initial remodel creates a clean aesthetic that the owners can build on when they bring in future changes, like the master bathroom or an expansion out the back.  Until that day, the flat provides a comfortable and beautiful home for a busy family of four.  


Contractor:  LH Construction, San Francisco
Architect:  tall glass architecture
Photos by Zach Moser

Tuesday, April 19, 2011

Kitchen Remodels - before & after shots

On the days that I spend dealing with permitting issues, it's really helpful to focus on the positive results waiting on the other end.  There are some great photos of the final products coming soon, but in the meantime, I thought I would post a few of my own 'Before & After' teasers.  Go ahead and click on them for a closer view.

Under-utilized and oddly laid out space became efficient, open and airy.  This kitchen was a dream to work on because it was already the perfect size.  No expansion necessary!


The dining room of this Edwardian fixer was revamped and opened up to the kitchen beyond.


This retro electric range was fun to look at, but not very practical.  We blew out the wall behind it as well, to make 
room for an eat-in kitchen.


Freshening up the color palette did wonders to tie this kitchen in to the California Mission style of the original home.

I will delve into the details of these kitchens and their larger projects in future posts.  For today, I'm just focusing on the light at the end of the tunnel!

Friday, April 8, 2011

Windows: Looking At Them Instead of Through Them

Last week, I was walking my dog in our old neighborhood, Bernal Heights.  I had my camera with me, so I took the opportunity to do a little survey of residential windows within a 3 to 4 block area. I think about windows, probably more than I should, and I'm often asked about the pros and cons of different options, so I thought I'd lay them out here.


I’ve posted two groups of windows from my walk.  The one above is a combination of old wood windows, replaced wood windows and replaced wood/clad windows.  The one below is an assortment of replaced vinyl windows and aluminum windows that are in dire need of replacement.  These photos can help define the aesthetic choices, but there is a lot more that goes into deciding on replacement windows besides looks alone.  At the top of that list is cost, followed closely by energy efficiency and durability.


A common question among homeowners is what kind of windows should be used to replace old single panes?  People are often aware of the need to install dual glazed windows, due to increased awareness and tax benefits for creating a more energy efficient home.  They look to advertisements and showrooms to figure out the rest of the specifications for windows, but a real comparison of the options can seem daunting.

The two main options that homeowners consider in the Bay Area are Wood Windows and Vinyl Windows. Let’s look at how these line up with regard to cost, energy efficiency, durability and aesthetics.

Wood Windows:  Wood windows were the standard in most homes built before the Second World War.  They were built to last and easily repairable, which is why we still see most of the originals around today.  Unfortunately, they’ve become the drafty windows that most of us complain about. Wood is a naturally insulating material, but the original single pane glazing tends to let heat escape.  Once replaced with more efficient glazing, there is no reason the new wood windows can’t last for another 100 years.

The downside to wood windows is the need to maintain them, especially on the exterior of the building.  A popular alternative is Wood/Clad Windows, in which aluminum profiles are applied to the exterior components to protect them from the elements without the need to refinish them.  Wood and aluminum make a good team because the wood handles the thermal insulation aspect, while the extruded aluminum profile creates a clean form on the exterior.  The aluminum's finish gives a strong resistance to fading and cracking. Aluminum profiles are available in a wide variety of colors.  Though they will not replicate the look of wood, they do strike a close comparison to painted windows, since they are basically wood windows wrapped in color. (Note: These are NOT the rattling aluminum windows of the seventies.)

Vinyl Windows:  These are the least expensive option, so they tend to be very popular.  I’ll be honest, vinyl is not on my list of recommendations, and here is why:
1)  The properties of vinyl change with temperature. Although all windows expand and contract with changes in the weather, vinyl expands more than twice as much as wood, and even more so in comparison to the glass it holds.  As a result, the seal between the glass and vinyl framework breaks.  This might not be an issue in more mild climates.
2)  When parts break, the whole window must be replaced.
3)  They cannot be painted, at least not successfully.
4)  The details on most vinyl products result in a window that tends to flatten the façade.  They are often installed so that the face of the window falls in line with the building’s face, creating no distinction or depth in the façade.
5)  Muntin bars are not an option in the construction of these windows. First, muntin bars are those little frames around smaller panes of glass in divided light windows. Since a huge percentage of vinyl sales go to replacing divided lights in older homes, the manufacturers offer pseudo-divided lights.  These are akin to a masking tape tic-tac-toe game between two panes of glass. They are everywhere.
6)  As petroleum-based products that cannot be repaired, vinyl windows pack a hefty cost to our natural resources and landfills.
7)  Vinyl windows actually aren’t allowed on street-facing facades in the City of San Francisco, but you wouldn’t know it by walking around. Check out the Planning Department’s Standards for Window Replacement here.

The aesthetic concerns that I’ve mentioned so far are not problematic just because they are unattractive.  The conditions I’ve described run contrary to the very essence of a window as an opening within a façade.  Historically, we’ve looked to windows to give our buildings character while providing a connection from the outside to the inside.  Windows are celebrated in modern and traditional buildings alike.  Whether with simple detailing or traditional ornamentation, they need to read as separate elements, with their own depth, set into the skin of the building. People who love their original divided lights need to recognize why they love them so much. My guess is that it has very little to do with the tic-tac-toe geometry and more to do with the way the sun catches each pane a little differently, the way the muntins can seem white in full light and a different color in the evening and the tiny streaks of light and shadow that surround each pane. 

Cost can be the determining factor for most people.  It’s important to remember that even among the low cost vinyl windows, you always get what you pay for.  The price of a higher quality vinyl window is not so far from the range of a wood/clad option.  When we take into consideration the other costs that I’ve mentioned, it makes a lot of sense to invest in wood or wood/clad windows, even if it means replacing them one façade at a time. 

Thursday, March 31, 2011

The Jigsaw Puzzle, continued.


I’ve returned with the scoop on how we are expanding a compact home with an equally compact addition. This garage addition includes two small bedrooms, a full bath, a laundry area and multiple storage closets. 
Original Garage & Entry

Expanded Plan

First, we took over the outdoor covered entry to create a foyer.  The bottom of the stair opens up to the new hall to bring the spaces together in a seamless way.  A key to designing for space efficiency is not to scrimp on the circulation areas.  This applies to furniture arrangement as much as to permanent fixtures. While it’s tempting to steal an inch or two, for a larger room or an additional piece of furniture, the fact of the matter is that we tend to experience constraint more acutely when we’re trying to get from one place to another.  Clutter comes in all forms.  Generally, if you have less than 3 feet to move, it needs to go. 

Child rearing does not conform to cut throat minimalism and it shouldn’t.  Play is a main component of any kid’s home.  Here, we’ve added a swinging bookcase that leads to a hidden nook under the stair, named for a certain wizard.  In the future, it will probably become suitcase storage, but for now it’s just big fun.

The bedroom sizes are more suitable for kids’ rooms.  We’ve made an effort to add interest to both rooms with floor-to-ceiling built-in cabinetry and a custom bunk bed.  In reality, no one can remember the size of his or her childhood room with any accuracy.  It always seems large when it’s all yours.  What we do remember are the cool nooks and crannies, so a focus is put on creating that level of specialness here.  The beauty of this layout is that the closet core can be removed when the kids go to college, leaving a spacious lower master suite that can be opened up to the garden.

Foundation walls should always be concealed when taking over garage space for living.  The addition needs to feel like it has always been there.  Furring out the walls takes up valuable space, but it helps to achieve a sense of permanence and provides extra wall depth for built-in storage, deep window openings and extra insulation.

Next: the biggest tiny bathroom I’ve ever designed.  It includes a short, deep soaking tub and a wall-mounted toilet to maximize the 4 x 6 foot space.   Wall-mounted toilets are now readily available for residential use in the US.  I am as excited as one can possibly be about toilet availability!  It’s the perfect solution for tiny bathrooms or for people, like myself, who like the idea of running a mop under a toilet instead of dealing with the knobby porcelain base.  A vanity is recessed under the stair, which brings about an angled head height situation.  Though not ideal, we chose to make this sacrifice to make the bathroom work.  It will feel quite spacious, especially for a secondary bathroom.  Stone tile at the walls will give it a crisp look, while deep recesses provide the opportunity to stash away bathroom clutter. 

For now, here’s a picture of that dreamy wall-mounted toilet tank!

Thursday, March 24, 2011

Thinking Inside, Outside and All Around the Box

For reasons I will get to shortly, cabinetry is on my mind today. It’s a key element to most residential projects and one that can be difficult to navigate.  Cabinetry is incredibly simple in its components, but executing a design properly can be more complex than people tend to realize.  We are really just talking about boxes, here.  If you’ve ever put together a piece of IKEA cabinetry, you know this first hand.  There are strong boxes and weak boxes.  I could ramble on about the difference between the two, but that’s really a separate topic from the issue at hand.  Suffice to say, I encourage my clients to go with plywood boxes with durable, high quality joints.

Now for the issue that has brought me to my keyboard today, the choice between custom and semi-custom cabinetry.  Let’s look at a comparison of two kitchens that I designed last year.  Project A decided to go with a local custom cabinetry shop and Project B through a cabinetry showroom in San Francisco that sells semi-custom cabinetry, shipped from a factory in Texas.  


Both involved a mix of two finishes. Project A is a modern combination of walnut plywood and pearl laminate slab faces.  Project B is a shaker style mix of cherry and painted cabinetry.  Both projects came out beautifully, but the roads to this end could not have been more different.

Project A followed a production process with which I am very familiar.   I was in contact with the cabinetmaker regularly.  He redrew my design, taking into consideration clearances that he would need for installation.  We checked and rechecked conditions and details before the cabinets were made.  They took a little longer to build than expected, but even that is not unusual for a project of this type.

I had never worked with a cabinet showroom before Project B.  This one provided a reasonable price and assured me that they would handle all cabinet-related issues.  I am usually responsible for checking the shop drawings that I mentioned above.  In this case, the showroom representative took over that responsibility.  In theory, the arrangement would require less of my time and I could pass that savings on to my client.  In reality, every shipment that we received from this company was faulty and had to be corrected by a local carpenter.  Even the shipments sent to correct previous shipments were wrong.  The company did take responsibility for all of its mistakes, but the cabinets were just finished today, nearly SIX MONTHS later, and I spent loads of time trying to correct their mistakes in the least wasteful way possible.  

In the end, a local cabinet source makes the most sense on so many levels.  Aside from quality control and accountability, there are a lot of economic and environmental benefits to supporting our local cabinetmakers. (For anyone interested, the cabinets in Project A were made by Kirby Cabinetry in Berkeley, California.)  


Friday, March 18, 2011

My Jigsaw Puzzle of a Project


L-R: Existing front entry, Excavated slab, New slab, Framing begins
So, here we go!  In the spirit of quick and spontaneous beginnings, I bring you the story of a little home near Twin Peaks in San Francisco.  When I say little, I mean barely over 900 square feet, and when I say home, I mean an abode that supports a family of four…and a dog.  They love their house.  They want to stay.  The six year-old is growing everyday and the teenager needs his own space.  

It goes without saying that a family living in cozy quarters might know a thing or two about space efficiency and making every square foot count.  They decided to take this approach downstairs to their garage.  Their current entry delivers them directly upstairs, with little room to even turn around. What if they could build out some rooms at the garage level, minimize the parking area and add another 50% of space to their home?    

There are several benefits to taking over garage space for an addition.  In this case, it flows perfectly with their layout because they already have an interior stair.  They have the option of doing a small affordable project right away and putting off a future project that would really open the rear wall to the garden. This approach avoids building a new foundation for an exterior addition, as well as the increasingly expensive and time-consuming process of getting a project through the San Francisco Planning Department.  The building permit for an addition that occurs within the existing home envelope is issued over the counter.  I was able to design the addition and pull a permit within three weeks of our initial meeting.

Rule number one with remodeling: There are always glitches.  Expect them, plan for them (to whatever extent possible.)  In this case, the first major glitch was a waffley garage slab.  We had planned to install a hardwood floor over it, on sleepers to compensate for the undulating concrete slab, but the resulting ceiling height of the new rooms would be less than the legal and comfortable height limit.  The decision was to remove the existing concrete slab and pour a new, lower and level slab that could work as the finished floor.  Ideally, radiant heat would be installed into this new slab, but these clients were already looking forward to a new 95% efficiency forced air furnace. 

Next glitch:  WATER. Lots and lots of water, draining from the top of Twin Peaks below their slab and out to the street.  A simple drainage system needed to be installed along the rear of the building while the slab was torn up.  This was all for the best, considering the poor quality of the existing sewage pipes below the slab.   They were swapped out and a future crisis avoided. 

The new addition includes two small bedrooms, an incredibly efficient full bath and a laundry closet.  Stay tuned to learn how we made it all work!

Getting Started.

Hi there, and welcome to hiccups!  I direct that welcome as much to myself as I do to you, since this is my very first entry, of what I hope will become a thick virtual diary of my architectural practice.  I’ve decided to start hiccups in order to document the processes, quirks and mishaps that occur during remodeling projects.  The highlighted jobs will be primarily residential remodels, since those are keeping me busy these days.  
 
I find myself struggling to ‘make a mental note’ of issues that come up during the design and construction of these projects, but the fact of the matter is that a blog’s memory can beat the heck out of mine any day of the week.  I'm turning to this blog to help me learn from my own experiences, and if it can help some others along the way, well that would be the icing on the cake.